How To: Equine Photo Manipulations
Equine photo manipulations are very much a form of art. A photo manipulation is when you take an element from one (or multiple) picture(s) and add that to another picture. They can be created using anything - not just horses. Photo manipulations (manips for short) can be very beautiful if created correctly. Keep on reading to find out how you can achieve a fantastic manip.
Before You Begin
Because manips are created on the computer, you will need certain programs to create them. Basic knowledge on how to work either programs is recommended.
Materials needed:
Estimated time to complete: 4-6+ hours
Materials needed:
Estimated time to complete: 4-6+ hours
Step One: Finding Stock
Stock are the photos that you choose to use to create your manip. These pictures are your background, subject, and also any extra things you may choose to add to your manip. Do NOT use Google // Bing // Yahoo (and other search engine) images as your stock provider! Many of these images have copyright rules, and are not intended for use as stock. Instead, head on over to deviantART.
 The "Resources and Stock Images" section of deviantART.com is where to go to find stock images.
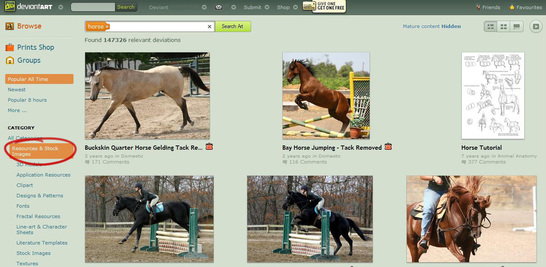
deviantART (dA) is a great stock provider - it has virtually anything imaginable. To use their stock, go to the "Resources and Stock Images" tab when searching. When searching for your stock, have an idea of what you want your manip to look like. For the purposes of this tutorial, we are going to create a simple manip: we want to make a manip of a horse standing in a meadow.
To find stock, simply type in a keyword in the search box. In the picture to the left, it shows that we searched "horse" to find our horse stock. To find our meadow stock, we are going to search "meadow" while still in the "Resources and Stock Images" section of dA.
Now, be warned, many photographers on dA have rules of use for their stock images. You must abide by them, or you could be charged with art theft. If you cannot follow at least one of the rules given, you cannot use the image. Many of the photographers require that you post your final image to dA - that requires you have an account on dA (which is free). So now that you have that knowledge, we can continue our search for stock.
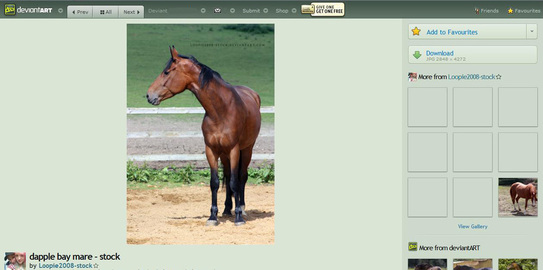 Our chosen stock - provided by loopie2008-stock.da
Here, we have found suitable stock - provided by the wonderful Loopie2008-stock on dA. It is recommended that you save the image with the photographer's dA username after it (ex: bay mare stock - loopie2008-stock) or leave the tab with the image open so you can give proper credit later. There are certain criteria that you should indeed keep in mind when searching for horse stock images.
All the criteria can be changed via Photoshop // GIMP, however, that creates extra work that you may not need.
To save your stock, right click on the image and "Save Image As" or simply click the download button on the top right hand side of dA. Keep in mind the photographer's rules. This particular image has certain rules that we must follow before saving // downloading the image. Her rules for use are:
"- can be used in art outside of Deviantart with credits on the image
- if used just on Deviantart, credit in the artist comments is fine
- must NOT be reposted anywhere in it's original form
- I require a link to the finished work
- personal use lineart is fine, but no free for use linearts may be created from my stock unless discussed with me first"
Since we can follow all the rules, we can use this image. Some images do not have rules, others have a few, and others have very strict rules. It depends on the photographer.
- Pose
- Color
- Lighting // shading
- Quality of image
All the criteria can be changed via Photoshop // GIMP, however, that creates extra work that you may not need.
To save your stock, right click on the image and "Save Image As" or simply click the download button on the top right hand side of dA. Keep in mind the photographer's rules. This particular image has certain rules that we must follow before saving // downloading the image. Her rules for use are:
"- can be used in art outside of Deviantart with credits on the image
- if used just on Deviantart, credit in the artist comments is fine
- must NOT be reposted anywhere in it's original form
- I require a link to the finished work
- personal use lineart is fine, but no free for use linearts may be created from my stock unless discussed with me first"
Since we can follow all the rules, we can use this image. Some images do not have rules, others have a few, and others have very strict rules. It depends on the photographer.
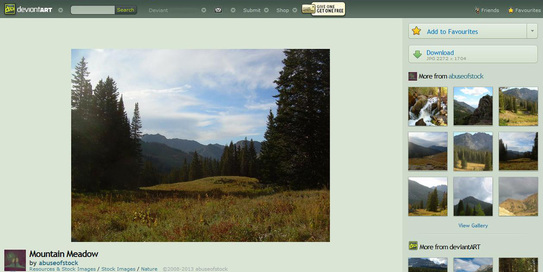 Our chosen background stock - provided by abuseofstock.da
Now that we have our horse stock, we need to find our background stock. Follow the same procedure as finding the horse stock.
When finding your background stock, find one with similar lighting // shading as your other stocks. It's best if you find one with the same light source - or at least a consistent one.
When finding your background stock, find one with similar lighting // shading as your other stocks. It's best if you find one with the same light source - or at least a consistent one.
Step Two: Combining the Stock Images
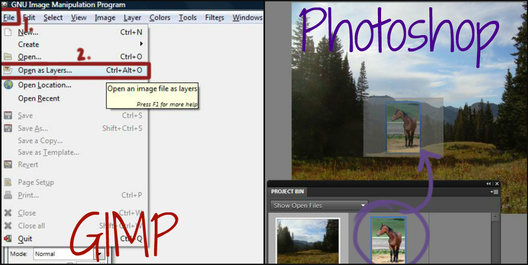
Combing the stock images is extremely easy. It's more than likely one of the easiest things to do in the manip making process. At this point, you're ready to open up either Photoshop or GIMP. We recommend Photoshop overall - it's definitely worth the price. However, GIMP is easier to work and understand for beginners. Both the programs are similar with their features, so switching between the two is fairly simple. We will be using GIMP 2.6 and Photoshop Elements 10. Please keep in mind that some features are different according to the version of either program you have. To differentiate between the two programs, GIMP instructions will be in red, and Photoshop instructions will be in purple. Shortcuts for both will be added in parentheses next to anything that has a shortcut.
 How to combine the images in GIMP and Photoshop.
To start, open your stock images as layers. If you don't open them as layers, you cannot combine them easily. To open them in GIMP, go to File>Open as Layers (or Ctrl+Alt+O). To open them in Photoshop, go to File>Open (Ctrl+O), then open Project Bin, and drag the horse stock onto the background stock.
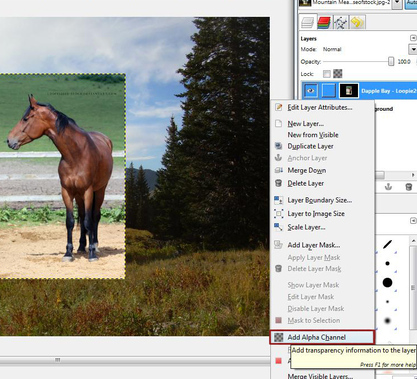 Making the horse layer transparent is required.
Now, you immediately want to make the horse stock layer transparent. This will allow you to cut out the horse stock's current background and let the background you wish to have show through.
Right click on horse layer>Add Alpha Channel
On Photoshop, as soon as you pull it out of the Project Bin, the horse stock will automatically become transparent.
You may need to resize the horse stock image to make it look like it actually belongs on the image.
Click on horse layer>Layer (in top bar with File)>Scale Layer - mess around with the dimensions until it looks right.
Click on horse image>Image (in top bar with File)>Resize>Image Size - note: you can only edit the size of the image when it is not combined with the background image. Typically, a 900px wide background will need a horse that is 500px wide (or for our horse image: 500px long).
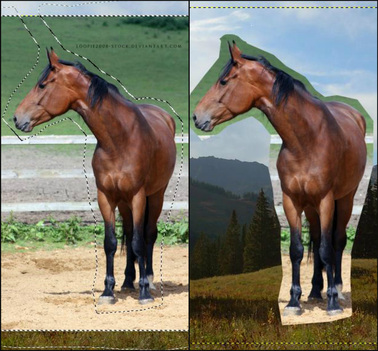
Step 3: Cutting Out the Horse
Cutting out the horse (removing the horse from it's current background) is a rather tedious task. It takes "Second Most Tedious Thing" in the manip making process - right behind the mane and tail redraw. Only do this step after you have made your horse manip transparent. This step is required as it will make your manip a real manipulation.
 Cut away the background first to make it quicker.
To start, grab your Free Select Tool (F) or your Lasso Tool (L) and select your horse layer. Zoom (Z) in so you're close enough to see what you're doing without doubt, but not enough to where you can't tell what you're cutting out. You may also use your Eraser (E) for this process although using the Eraser is easier to do in Photoshop than in GIMP.
Start by removing large chunks of the background with the Free Select Tool or Lasso Tool around the horse. Make sure you are on the horse layer. Once you have selected the background you wish to delete, hit Delete on your keyboard. You can remove the "marching ants" with Ctrl+Shift+A or Ctrl+D. The "marching ants" is the moving white line that surrounds the area you are going to remove.
Start by removing large chunks of the background with the Free Select Tool or Lasso Tool around the horse. Make sure you are on the horse layer. Once you have selected the background you wish to delete, hit Delete on your keyboard. You can remove the "marching ants" with Ctrl+Shift+A or Ctrl+D. The "marching ants" is the moving white line that surrounds the area you are going to remove.
Now, zoom in. Take your Free Select Tool or Lasso Tool, and cut out the horse. Make sure you are cutting on the horse so that you don't leave any of the previous background behind. You can even place your Free Select Tool or Lasso Tool a few pixels inward on the horse so that you, without doubt, won't leave the background. Try not to remove too much of the horse or else it will look awkward and unnatural. When cutting out the horse, make sure you are following the outline of the horse. Keep your movements consistent: don't remove a ton in one area, and then hardly remove any in another. Remember, the point of the manips is to create a picture that looks like it should be together in the first place.
Continuously zoom out (Z+Ctrl or Z+Alt) to make sure it looks good. It's recommended that you only do parts of the body - opposed to cutting out the whole horse at once - just in case of mess ups. Continue to do this until your horse is completely cut out if it's previous background.
Continuously zoom out (Z+Ctrl or Z+Alt) to make sure it looks good. It's recommended that you only do parts of the body - opposed to cutting out the whole horse at once - just in case of mess ups. Continue to do this until your horse is completely cut out if it's previous background.
Completely cut out horse stock.
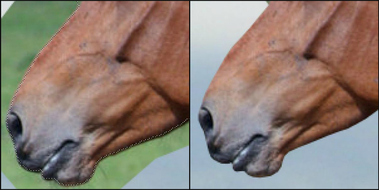
Step 4: Smudging
This step isn't required, but it removes any imperfection on the horse. It gives the horse an overall beautiful look. Many people overdo this step, causing the horse to look unrealistic. This is called "over-smudging".
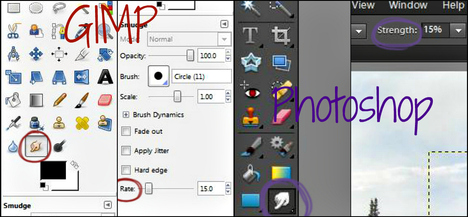 The smudge tool, in both programs, is shown.
To do this, grab your smudge tool (S) or (R). Regardless of the program you're using, the smudge tool looks like a hand with an outstretched index finger.
Now, you are going to look at the tool bar to see the settings of the smudge tool. The size of the brush doesn't matter so much as the opacity and such. Always readjust your brush size according to the area you're working in. For example, you'd need a smaller brush when working with the face and legs, than you'd need when working with the body. Take the rate or strength down to a number between 10.0 and 20.0. 15.0 works best for the majority of manips, however always go with your best judgement.
Now, you are going to look at the tool bar to see the settings of the smudge tool. The size of the brush doesn't matter so much as the opacity and such. Always readjust your brush size according to the area you're working in. For example, you'd need a smaller brush when working with the face and legs, than you'd need when working with the body. Take the rate or strength down to a number between 10.0 and 20.0. 15.0 works best for the majority of manips, however always go with your best judgement.
 Never over-smudge!
After you changed the settings, run the smudge tool over the horse, making sure you are still on the horse stock layer. Take care not to over-smudge. Going over an area once with the brush is plenty. Make sure you get everywhere on the horse - if you miss a section it will look strange later on. Never touch the mane and tail with the smudge tool! This is a common mistake: it makes the mane and tail look extremely unnatural. Never touch the mane and tail with the smudge tool.
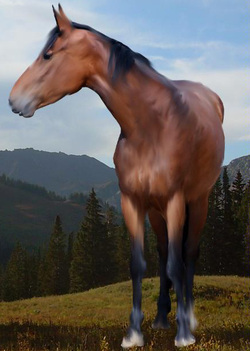
To the right, we see an example of an extremely over-smudged horse. This is an example of what not to do with the smudge tool. As you can see, the majority of the horse's features are blurred away. There isn't any muscle tone or definition anymore. The horse's colors are all burred together. This horse doesn't look realistic anymore.
To the right, we see an example of an extremely over-smudged horse. This is an example of what not to do with the smudge tool. As you can see, the majority of the horse's features are blurred away. There isn't any muscle tone or definition anymore. The horse's colors are all burred together. This horse doesn't look realistic anymore.
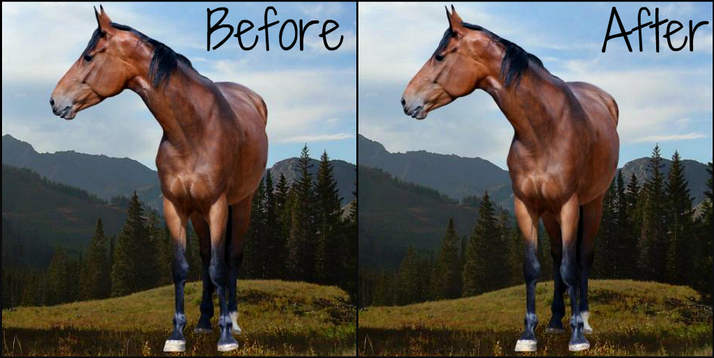
There should be a very subtle difference before and after smudging.
Step 5: Color // Lighting Changes
Sometimes the horse has a blue hue to it, while the background may have a red hue to it. We need to change that to make our finished manip look more realistic.
GIMP:
GIMP:
- Colors>Color Balance
- Edit the colors for both the background and the horse until they match.
- Enhance>Adjust Color>Adjust Hue // Saturation
- Edit the colors for both the background and the horse until they match.
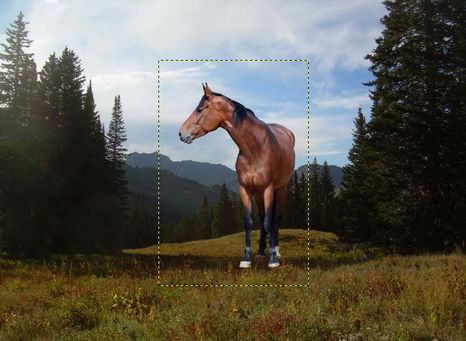
Step 6: Grounding
As of right now, our horse looks like she's floating on the image. This gives the manip an overall unrealistic feel. Because the horse looks like she's floating, you can obviously tell that it's not just one image, but two images poorly combined.
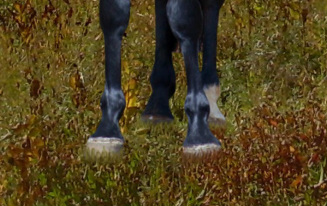 Your finished grounding should look like this.
Before starting, add a new layer - above the horse stock layer - and title it "grounding". Click on your horse layer again, take your blur tool (Shift+U) or (R), and blur the edges of the hooves to make it easier to cover up. Put the blur tool on a rate or strength of 70.0 to make it quicker and easier to do. From this point on, until otherwise stated, you will be working on the "grounding" layer.
Use your color picker tool (O) or eyedropper tool (I) and select a color from the grounding in your picture (take a color from the grass, sand, dirt, leaves, etc. that are near your horse's hooves). Take your brush tool (P) or (B) and shrink the size of the brush down to about 2 or 3px. Start painting whatever your grounding is (grass, sand, dirt, leaves, etc.) over the hooves, to give the appearance that the horse is actually standing in the picture. Take multiple colors (a base color, a shadow color, and a highlight color) to give it dimension. As the grounding color changes, so should your chosen colors. Once you have finished painting in the grounding, take your blur tool (Shift+U) or (R) and put it at a rate or strength of 20.0 and drag across the edge of where you painted. This blends it in with the actual background's grounding enough to make it look like the horse actually belongs in the photograph. In this step, also add in any shadows or reflections that may be necessary.
Use your color picker tool (O) or eyedropper tool (I) and select a color from the grounding in your picture (take a color from the grass, sand, dirt, leaves, etc. that are near your horse's hooves). Take your brush tool (P) or (B) and shrink the size of the brush down to about 2 or 3px. Start painting whatever your grounding is (grass, sand, dirt, leaves, etc.) over the hooves, to give the appearance that the horse is actually standing in the picture. Take multiple colors (a base color, a shadow color, and a highlight color) to give it dimension. As the grounding color changes, so should your chosen colors. Once you have finished painting in the grounding, take your blur tool (Shift+U) or (R) and put it at a rate or strength of 20.0 and drag across the edge of where you painted. This blends it in with the actual background's grounding enough to make it look like the horse actually belongs in the photograph. In this step, also add in any shadows or reflections that may be necessary.
Step 7: Mane and Tail Repainting
You've made it this far - congratulations! You've made it to the most tedious and time-consuming part of the manipulation making process. This step, alone, can take upwards of 2 hours.
There is no specific way to do this. For your ease and comfort, we have selected three wonderful tutorials on dA that will help you. You can choose a technique through one (or more) of these three techniques - you can also find more tutorials here for additional help. Remember that there is no wrong way to repaint manes and tails, so do what you feel comfortable with.
There is no specific way to do this. For your ease and comfort, we have selected three wonderful tutorials on dA that will help you. You can choose a technique through one (or more) of these three techniques - you can also find more tutorials here for additional help. Remember that there is no wrong way to repaint manes and tails, so do what you feel comfortable with.
- Aur's Mane Painting Tutorial - auredd.da
- Hair Tutorial - fahlaemee.da
- Hair Tutorial - hearttosoul.da
Step 8: Eye Repainting
This step is completely optional. If you don't want to take the time to repaint the eye(s), or like the eyes the way they are, you can continue on. Repainting the eye allows you to change the color of the eye (brown to blue, black to green, blue to purple, etc.). It is also a really simple and quick step.
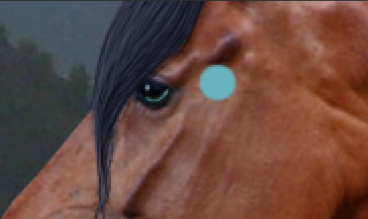 Repainting allows you to change the eye's color.
First, create a new layer and title it "eye". From this point on, unless otherwise stated, we will be working on the "eye" layer. Next, zoom into the eye. Don't zoom in too far - make sure you can see the full eye. Then choose the color you want for the eye. Take your brush (P) or (B) and shrink it down to a 1px size. Change the rate or strength to around 50.0. Outline where you want the color to go, and fill it in. After filling it in, shape it up and erase some of the edges with an eraser size 2px and a rate or strength of 50.0. Add in a light shine with a fuzzy brush. The light shine goes in the direction that the horse is looking.
Step 9: Completion
Congratulations! You have just made your first equine photo manipulation! At this point, you can either call it quits and flatten the image (right click on layers and select "Flatten Image") or you can continue making minor edits to it. Minor edits you can make are sun flares, adding in another subject, blurring the background, changing the curve levels, etc. You can mess around with it until it reaches your satisfaction. For this manip, we added in a sun flare, a flying eagle, and also paint and a feather to the horse.
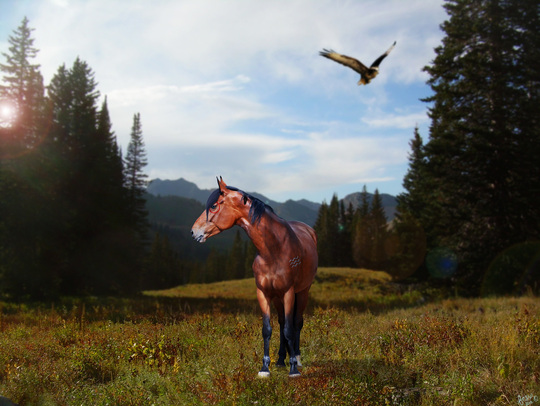
Here is the completed manipulation.
